A quick beginner’s guide to drawing
6 drawing exercises to get you started right now!
The basic craft of drawing is about two things: you learn to control your hand and to see.
Tip: For the following 6 exercises I suggest you stick with one pen and one particular type of paper (for instance A5).
Dexterity — two workouts
The first two exercises are about controlling your hand. We want to build muscles and train our hand-eye-coordination. Mechanical exercises like these are great for beginners. Later on you might use them to explore new pens or get started when you don’t know what to draw yet.
They are also terrific ways to relax your mind.
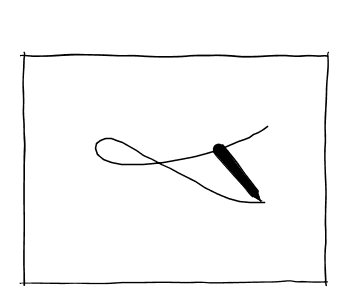
Exercise 1: Circles — more is more!
Distribute circles of various sizes on a piece of paper until the paper is filled. Make sure the circles do not overlap.

Drawing circles is not as easy as you might think. Notice how the circles become harder, the bigger you make them? Try them in both directions — and make lots of them.
Tip: Shake your hand when it starts cramping! This is a workout for our hands after all.
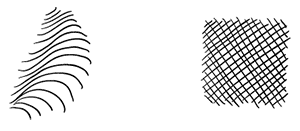
Exercise 2: Hatching — the joy of structure
Fill a piece of paper with parallel lines.
Diagonal lines come easiest for us because they comply to the motion of our wrist. Did you notice how left-handed people prefer the opposite direction than right-handed people? Have a look at drawings by your favourite draughtswoman or draughtsman (in my case: Leonardo), and guess which hand they used!
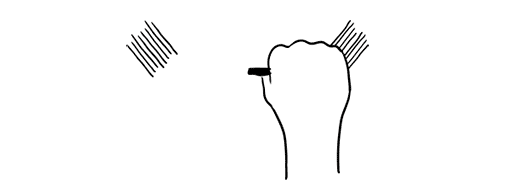
Now make sure to try other directions as well. Have fun! Combine various hatchings and enjoy watching the darkness spread on your paper.
Tip: Don’t rotate the paper. The whole point here is to train your hand to get comfortable with all directions.
So now that we have worked our hands a little, let’s train our eyes!
Perception — learning to see
Drawing is mainly about seeing and understanding what you see. People often assume that everybody sees the same, but actually seeing is a skill which you can improve. The more you draw, the more you see. The next four exercises will make you see more.
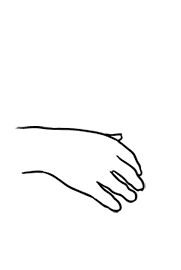
Exercise 3: Contour — Show me your hands!
You see all those fascinating contours of your hand? Collect them on a piece of paper! Don’t try to draw the whole hand yet, just pick some of those lovely lines.

Whether you draw a person, a plant, or your favourite animal, it is usually the contours that define a body or object and make others recognise them. The challenge is less to draw those distinctive lines but rather to see them in the first place!
Even if you think you already know the shape of an object, it is always worth to take a closer look and rediscover it.
Exercise 4: Chiaroscuro — folding light and darkness
Arrange and draw a piece of cloth. Start with the contours and then — using your hatching skills — create an interplay of light und darkness.
This exercise gives you a sense for light and darkness. I have to admit it is not the easiest and might as well be part of an advanced tutorial. Keep in mind: This one is not about getting it perfectly “right”. The cloth is a playground to try out those various hatchings you have practised before and feel how you can create light and shadows with your — almost — bare hands!
Tip: You can use curved hatching to modulate the shapes, and crosshatching to achieve darker areas that resemble woven structures.
Tip: Close your eyes just a little bit when you look at the cloth. You will see everything blurred, but you will also see an enhanced contrast between light and dark.

The arrangement of light is a great way to show what is important in a picture. Just have a look at paintings by Rembrandt or Georges de la Tour. And the next time you watch a movie look out for dramatic effects achieved with light and shadow.
Exercise 5: Perspective — lost in space
Let’s draw some cubes! Just follow the simple steps below.

Perspective drawing is basically a projection of a 3D environment on a 2D surface (your piece of paper).
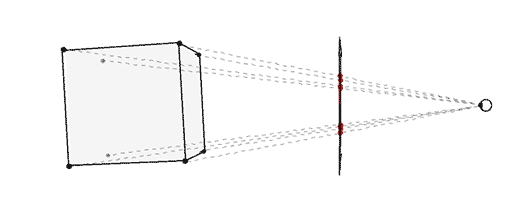
Constructing perspective drawings is a bit of a science and cannot be covered in detail within the attention span of an online article. Nevertheless we can have some fun with a simple technique that gives us an intuitive feel for the magic of perspective drawing:
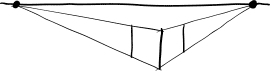
Step 1: Draw a horizontal line. This is the horizon of your picture.

Step 2: Define two points on the horizon near the edge of the paper. These are your two vanishing points.

Step 3: Draw a vertical line somewhere.

Step 4: Connect the endpoints of the vertical line with the vanishing points.
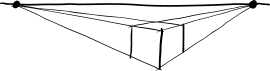
Step 5: Add two vertical lines like this:
Step 6: Connect them with the vanishing points.
Step 7: Now use a dark pencil or pen to emphasise the cube. Voilà!
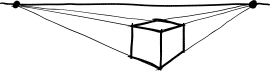
Repeat steps 3–7 as often as you like. Have fun! If you feel adventurous you might even hatch the sides of the cubes.
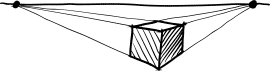
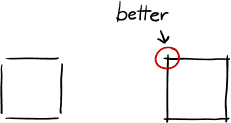
Tip: When you draw lines that meet, it is usually a good idea to be confident and let them overlap a little bit. The shapes will look better defined.
Mastering perspective drawings will give you the power to create illusions of depth. But most importantly, you teach your brain how to think in three dimensions. So even if you choose to draw “flat” drawings or mess with the “rules” of perspective — which I like to do — to understand perspective drawing is still one of the most precious drawing skills you can learn.
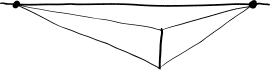
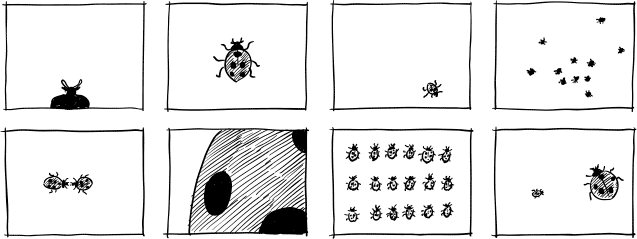
Exercise 6: Composition — Why is this there?
Make 5 different drawings of an object. Arrange the object differently on the paper each time!
Composition is a great tool to “say” something with a drawing, to shape its meaning or message.
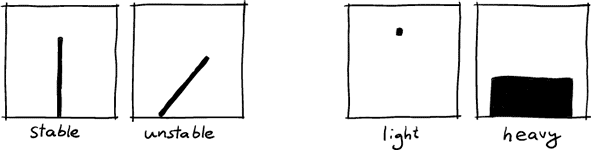
To understand how it works we have to bear in mind that our perception has been shaped by everyday experiences. For instance horizontal and vertical lines seem more “stable” to us than diagonals, which might “fall over” any second. And when we see a big dark shape at the bottom we somehow assume it must be “heavy”.
As you try different arrangements of your subject on a piece of paper, notice how this changes their connotations — their meaning.
Let me know what you think!
Since this is my first drawing tutorial, I am curious about which parts you enjoyed. What else would you like to learn about drawing? Please leave ideas and suggestions in the comment section below!
Oh, and here is part II: “5 more drawing exercises”!
Here is a video of me talking about drawing (with animations of course)!
Before you go
If you enjoyed this article, then subscribe to my mailing list to receive more animated stories!
About step 3, is this to draw hand by myself, or put the hand on paper then use pen or pencil to trace it? I did step 1 and 2 several days. But get stuck on step 3
I believe it is to draw your hand or a hand not to trace 🙂 the idea is to look for lines.
Also ty Ralph, really enjoying these exercises and the way you have animated the examples. It is the best drawing guide iv found as a beginner 🙂
I’d like to learn more about shadow’s, I absolutely love how people use shadow’s In their pictures. Could you do a tutorial on that? I loved this one btw.
It’s very easy and clear for the beginners
Excellent. I loved the way you drew the cube using connecting the vanishing points. Very clear, easy to follow. I just watched your Tedx talk, How drawing makes us think. It’s brilliant. Thank you.
Tutorial is pretty awesome! I’ve always wanted to bring what’s in my head into paper but it just never comes out thanks to no formal training at all. Everyone has to start somewhere and thanks for giving us a perspective on how to look for accents when drawing. Doing this tutorial gave me more confidence in believing that I need to take a class haha.
The perspective helped a lot
I like the way it showed me how easy it is to draw thank you
hi there,
i really liked the way you have explained on how to draw easily and. it was really helpful for me.
i am an art and craft teacher teaching in an elementary school. i really struggle to teach children Art because i have not been to any Art colleges, institutes, schools or classes.
is it possible for you to guide me the way you have guided in this lesson if i give you some Art topics? i will really appreciate if your answer will be yes.
Thank you in advance.
Paresh
What Art topics are you thinking of?
Your TEDx video brought me here, and guess what, I am glad I did so. Absolutely amazing!
Very detailed, I really enjoyed your tutorial. My question is what materials should beginners buy before following these steps?
I personally always prefer a small set of simple tools. People tend to buy way too much stuff, sometimes as a substitute to actually do the drawing. All you need is a pen and a piece of paper. Any pen will do, any paper will do. (I prefer black 0,3 mm pens most of the time.)
Honestly, for me step 3 was the hardest. I’m not sure if you go into more detail about contours in another video, but drawing my hand was not only hard, I just didn’t know how to start thinking about contours. I feel like the hand is a pretty advanced object to draw.
Thank you so much! I watched your TEDx video and was inspired to draw again. I used to draw in my youth but stopped. At 60, it is amazing to realize how much I’ve visually glossed over details without really looking. Drawing is wonder-full!
Several other tutorials I’ve explored have a bit too much fluff; will be looking for more like this. I appreciate the concise info and exercises are simple enough to practice right away. It’s also easy to see how the basic ideas could be incorporated to more complex ones. Thanks!
Wow this was so helpful ,insightful and fun
This was helpful for beginner’s.
This will help people learn how to draw
Thank you for the wonderful tutorial! I have always been interested in drawing but then life happens!! Recently I’ve wanted to explore something different from the things I normally do. I stumbled across your page while looking for something totally different haha No kidding!! But nevertheless I’m happy I did. The first two exercise were kinda like warm up and I really enjoyed them. But when I looked at step 3, I wasn’t sure I could do it but once that pencil touched the paper I could see myself actually looking at it differently, there was this force that got over me making me believe with each stroke! I wouldn’t call the outcome perfect but I did surprise myself! And then went onto 4, 5 and 6. Step 4 was probably the most challenging for me. But I did keep the same subject and tried it 3 different times and by the time I got to attempt 3 of step 4, I was quite happy! Now I’m motivated to try the next post. I would like to send what I have to get your opinion if you have a minute to spare. Nevertheless I appreciate this post and all the guidance you’ve provided! You’ve made me believe the art in me is still alive and waiting to be rekindled and explored!
thank you. fantastic, clear and simple tutorial leaving me very little room to procrastinate – including the fact i already have multiple pens and paper and really don’t need to buy new supplies before trying this. the animations are really helpful and engaging though i suspect steps 3-6 are harder than they look.
I don’t know anything related to sketching or drawing but after going through this I felt I can do some sketches I mean my confident level has been boasted further. I’m going to try out your 6 exercise and I want to follow more related to drawing and guidelines. Thank you so much for making me trust myself
Thanks a lot for your lesson! This is very, very helpful. I just accidentally found your site yesterday and I can’t put it down – I just fell in love. The information is very fun, concise, clear and helpful. I want to become a tattoo artist and these exercises are great for me to start this journey.
Seemingly simple exercises that hide some complexity and challenge. I, who am an eternal beginner, think that your technique helps a lot to unlock the blank paper and risk new forms and explorations. The question of seeing the details and bringing it to life is very interesting. Thanks for your valuable tips.
These exercises are great for beginners! I especially felt like an artist with the Circles, Hatching and Chiaroscuro exercises. I am a fifth grade teacher (not Art), and I am thinking about using some of these exercises as first days’ activities. Students more than likely have not been writing over the summer and this will give them an opportunity to get those muscles moving again, plus we would have something awesome to display, no one crying, “I don’t know how to draw!”, as these are all open entry!