5 more drawing exercises
on the difference between seeing and knowing
The following exercises are a bit more advanced than the ones in the “Quick beginner’s guide to drawing”, and I hope you find them equally fun!
We are going to focus on different aspects of observation to strengthen our visual thinking.
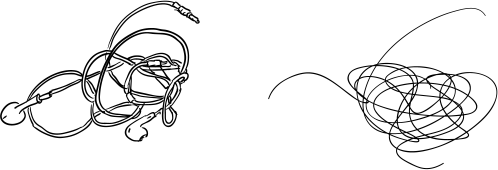
Exercise 1: Negative Space — see what is NOT there
Draw the spaces in between things!
See the “hole” in the handle of your mug? Those weird shapes between your fingers? Look around and find empty spaces in between things. Simply collect and arrange them on your paper anywhere you like.
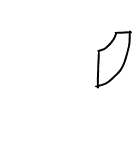
We tend to see — and draw — what we already know. There’s a car, there’s a house, this is my cat, etc. Our effort to recognise things makes us blind to their shapes. When we focus on what is between the objects we trick our perception to actually see the shape of the objects.
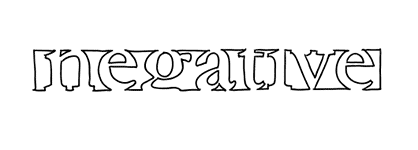
Tip: Type designers know about the importance of negative space. Pay attention to the spaces between the letters to see the characteristics of a typeface!
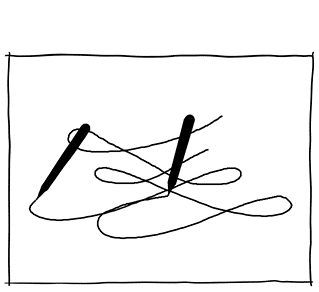
Exercise 2: Dynamic drawing— see movements
Draw the dynamics of something static!

In this exercise we capture the movements of the things in a quick line drawing:
The contour drawing on the left is about “What is there?”, the dynamic drawing on the right is about “What is it doing?”.
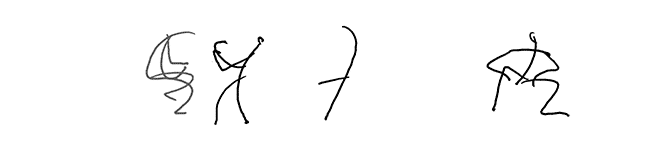
When you draw people — even while they are keeping still —it is of particular importance to give the viewers a sense of movement, of the forces that affect the body.
To see and draw the characteristic movements within a scene will make your drawings come to life. They are the melody of the picture.
Tip: Execute the dynamic drawings quickly but not carelessly! They are short bursts of utmost concentration.
Note: Some refer to these kinds of drawings as “gesture drawings”. I prefer the term “dynamic” because this is all about the dynamics of the subject.
Exercise 3: Foreshortening — see in perspective
Find a box-shaped object, see its vanishing lines, and then draw it!

In the beginner’s guide we constructed a cube. A horizon defined our eye level. The vanishing points helped us to draw the proper foreshortening of the sides.
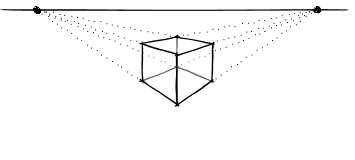
This time we are doing it the other way around: We discover the diagonal lines in cubical objects.
Find a cubic object and observe the foreshortened box shape. Take your time! Look! Can you see how the lines converge towards the vanishing points?
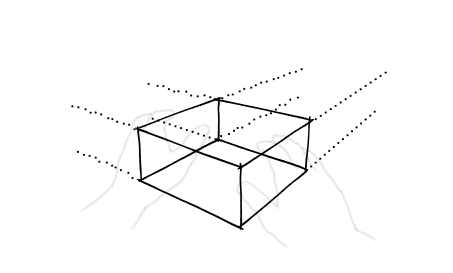
Now draw a wireframe box of your object! You don’t have to define the horizon or the vanishing points. Roughly guess where they are and converge the lines accordingly. Find more box-like objects of different sizes and make plenty of those drawings!

Exercise 4: Proportion — see flat
Draw a window — and what you see outside!
The term “proportion” describes the relationship of sizes. Before we grab our pens, it helps to understand why it is so difficult to compare the sizes of objects at varying distances.
Things that are far away appear smaller. We have learned to take the distance into account when we compare sizes.

There is a difference between the sizes that we actually see and the sizes that we know. “Optical illusions” like the one below demonstrate the power of our perception. Our brain takes clues from just a couple of diagonal lines, constructs a virtual space and “calculates”, that in this space the man on the right must be taller:
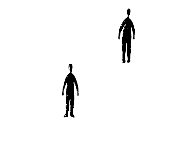
This compensation mechanism is very useful in our everyday lives. But it makes it difficult to estimate and compare the sizes we need in our drawings. To get the right size “on paper” we must ignore the size we know, and draw the size we see. We know that a person further away is not smaller but we need to draw them smaller on our paper.
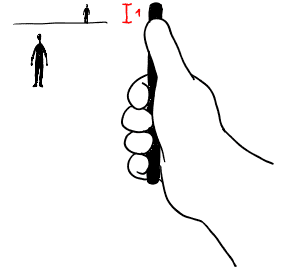
There are tricks to overcome the distractions and “see flat”. One of them is to hold your hand at a constant distance from your eye and measure the “flat” size with your pen.
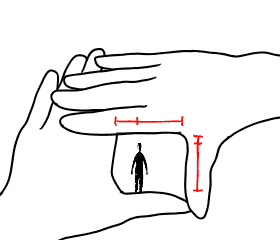
Another one is to frame what we see. It helps us to see the flat rectangular picture which we are going to draw, to estimate the sizes “on paper” and compare them properly.
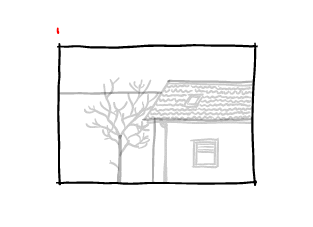
I suggest you look at the world through a window. The window frame serves as a reference to figure out for instance, where the tree stands in the picture or how tall that house is.
Exercise 5: Depth — see overlaps
Draw a plant!

There are only few pleasures like the peaceful hours in nature drawing plants. And also few that require so much of our concentration. We need to focus our attention and avoid to fall for banal symbolic expressions.
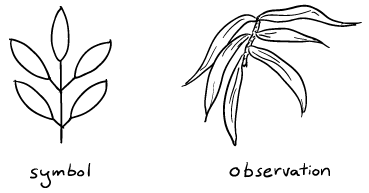
Of course the complexity of nature can be overwhelming at times. I suggest, you pick only a small detail of a plant, start with a single leaf and take it from there. Climb from one leave to the next. And when you draw a leave or stem, make sure to consider the whole shape, even the parts that are obscured. The overlaps will create a satisfying sense of depth.
While we want to draw as accurately as possible let’s keep in mind that every drawing is an abstraction. And just like a good story it has to be plausible, not always accurate. So when shapes overlap in an unclear manner it is often a good idea to clarify such ambiguity for the viewers.
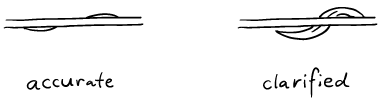
This power to clarify may be one of the biggest advantages which drawings hold over photographs.
Escaping the “symbol trap”
These exercises aim to switch our minds from only recognising objects to observing shapes. If you are curious why this skill is vital for creative thinking, have a look at “Seeing vs. reading”.
Did you have fun?
I am curious about which exercise you like most and why. What aspects of drawing are you struggling with? What drawing topics should I cover in the next set of exercises? Please use the comment section below!
Before you go
If you enjoyed this article, then subscribe to my mailing list to receive more animated stories!
I really learned new and some old things from your exercises and narratives. Thank you.
Would you critique my skill if I sent a drawing to you?
This article was definitely useful for me because I’m learning how to draw and I was needed this vital information. Thank you) I have already known the last two tips, but the first ones were really amazing, especially number 1))
I’m trying to teach myself trying while out of school. It’s hard to find professional quality tutorials online without paying for a full online course. These exercises help me learn things more fundamental than “How to Draw a Tree” or something else I might find online. I feel like I’m training my hands and eyes like I might in a professional course. More training like this would be amazing. Thank you for this.
This article is amazing ! Just about what I struggle seeing which is a lot, it was covered.
Thank you,
from a learning artist.
I think i found my favorite page to follow. I can’t wait to analyse and work on the points you mentioned. ALL OF THEM!!
You have pretty unique content, great work! Keep it up!
Great lessons for a beginner, you explain the basics for straying really well and I have found the exercises so useful. Much better than two face to face local courses so I will be following your tutorial. Thank you!
Oooh, I am So happy to find You and your page! I studied aplied Arts long time ago, but after having kids & family, more than 10yrs ago, I abandoned So many skills I had…and now I am really happy to see these forgotten paths to follow!
Thank You SO MUCH
Greetings from Czech Republic, Prague
Káťa Duspivová
Wonderful! So happy to have found you – again! I wish everyone who googled ‚learn how to draw‘ came across your page!